This second part of the series will show how Odoo Inventory can help you locate products in the inventory and set different removal strategies. Before we learn those, we advise you to read the initial article first if you have not.
Getting started with Odoo Inventory 1: The basics was our first attempt at showing what is possible with this unique double-entry inventory management system.
However, if you are all caught up, you are ready for part 2 of the Odoo Inventory series. Let's find out the inventory management issues & how to solve them with Odoo Inventory.
Table of Content
Issue: Inconsistent Tracking & Limited Inventory VisibilitySolution: Product Track with Lots/Serial Numbers
Tracking products with Serial Numbers
Tracking products with Lots
Solution: Order Management with Removal Strategies
Setting FIFO Removal Strategy in Odoo
Setting LIFO Removal Strategy in Odoo
Setting FEFO Removal Strategy in Odoo
Issue: Inconsistent Tracking & Limited Inventory Visibility
What happens if a company's inventory cannot be found or identified? They are unable to ship products on time. They will waste money on unprofitable items and incur unnecessary expenses. All of this will hurt the company's reputation.
You must be able to track products in the inventory to gain good visibility. This will assist businesses in detecting theft and counterfeit products. If a defect is discovered while producing a batch of products, you can also determine which unit is affected.

Solution: Product Track with Lots/Serial Numbers
There are two ways to track products in Odoo. The first is tracking with serial numbers, and the second is with lots.
Each product assigned a serial number is for identification purposes. Serial numbers, for example, are used to identify most electronic devices, such as laptops, smartphones, and other handheld devices, since they will come along with warranty service or after-sales services.
In the case of lot tracking, a batch of products is assigned lot numbers to help businesses trace products by expiration date, manufacturer, or production date. The Food & Beverage industry is an example of product batch tracking since the products have production and expiration dates that are vital to control the quality, product recall issues, and more.
To apply the Odoo tracking method, you must first make a little configuration to track any product with either serial numbers or lots in Odoo Inventory.
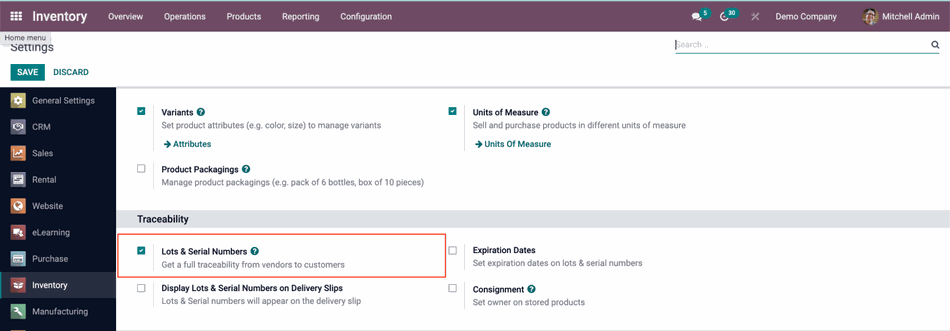
Go to Configuration → Settings. Ensure the Lots & Serial Numbers feature is checked in the Traceability menu.
Tracking products with Serial Numbers
1. Product Configuration
You can only track storable products in Odoo. So, ensure that the product type is set as ‘Storable Product.’
Go to Products → Products.
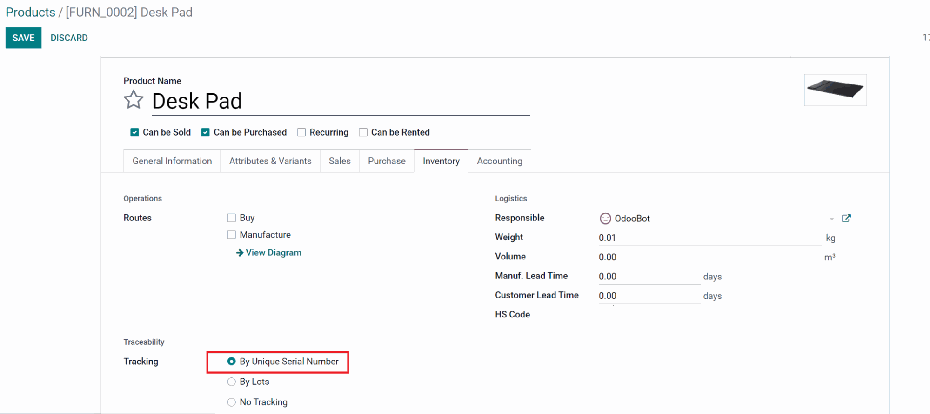
Choose a product. Here, in the “Desk Pad” product. Click the Edit button and set the product type as 'Storable Product'
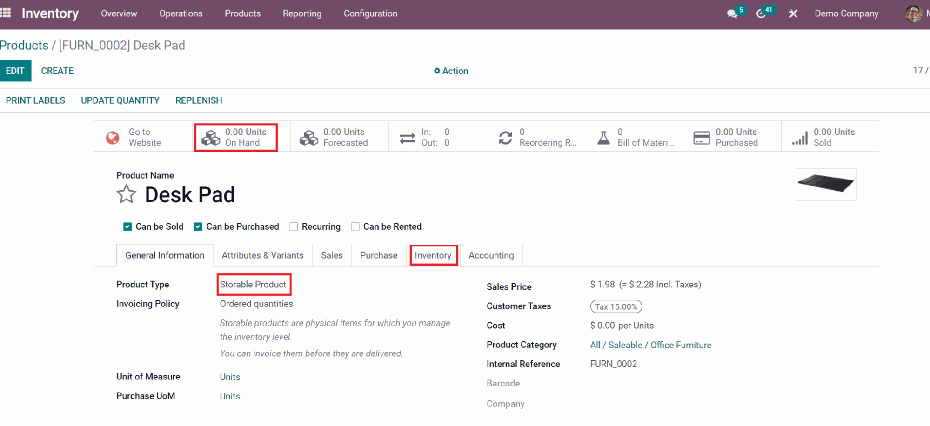
Under the Inventory tab, choose to track the product ‘by Unique Serial Number’, then Save.
2. Assigning a serial number to a new product with no stock
The Odoo integrated feature allows you to manage product movement with serial number tracking between the Odoo Inventory, Purchase, and Sales apps in real-time.
If you want to assign serial numbers to a new product with no inventory stock, you can do so directly when making a purchase order in Odoo Purchase.
In Odoo Purchase, after confirming the (Request for Quotation) RFQ, click on the Receipt button to manage the stock-in/product receipt note.
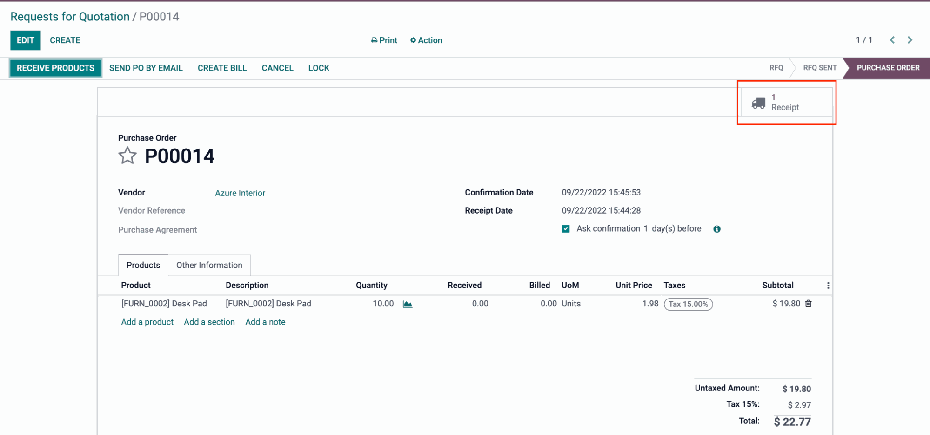
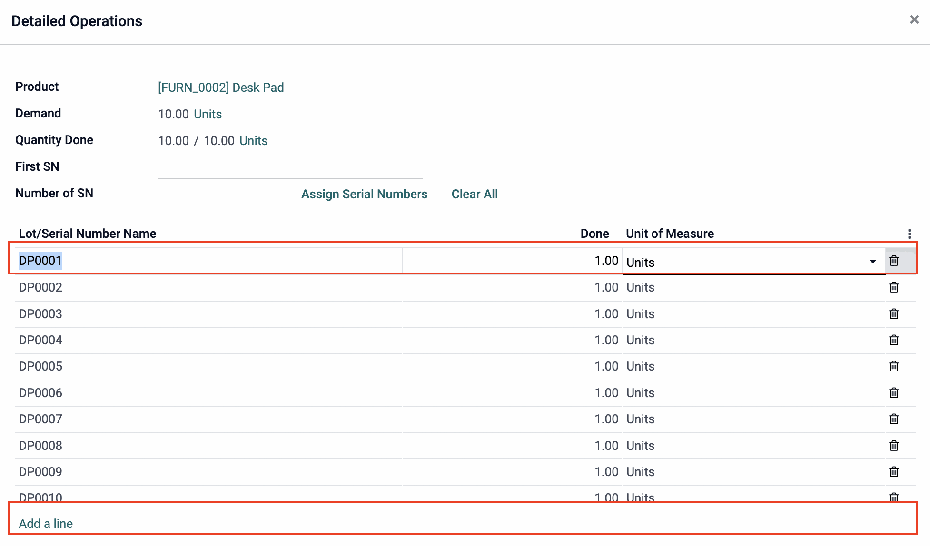
In the product receipt note window, you can assign the serial numbers for the product by clicking on the 'Detailed Operations' icon. In this wizard, there are three ways for serial number assignation. You can manually assign the serial number by Add a line.
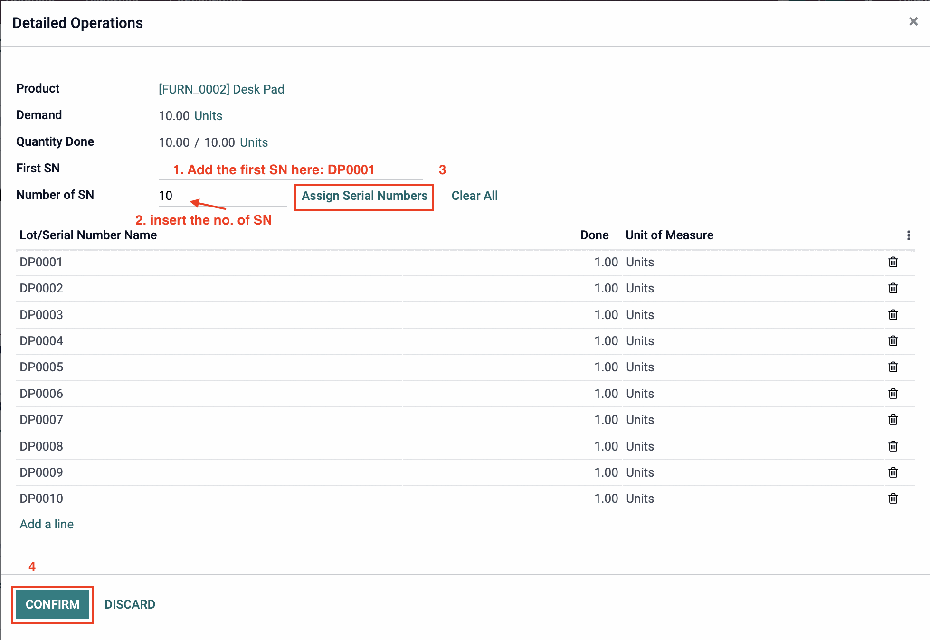
Or using the multi-assignation function as below:
Or Copy/paste the serial numbers from an Excel file. For more information on this, you can visit Odoo documentation.
Having successfully assigned a unique serial number to each product you purchased, you can then go ahead to save and validate the receipt note.
In Odoo Inventory → Products → Lots/Serial Numbers, you can see the product’s serial numbers recorded.
How does serial number tracking work in the Odoo Sales app? In any sales order (SO), you can view and choose the product stock with unique serial numbers to sell/deliver.
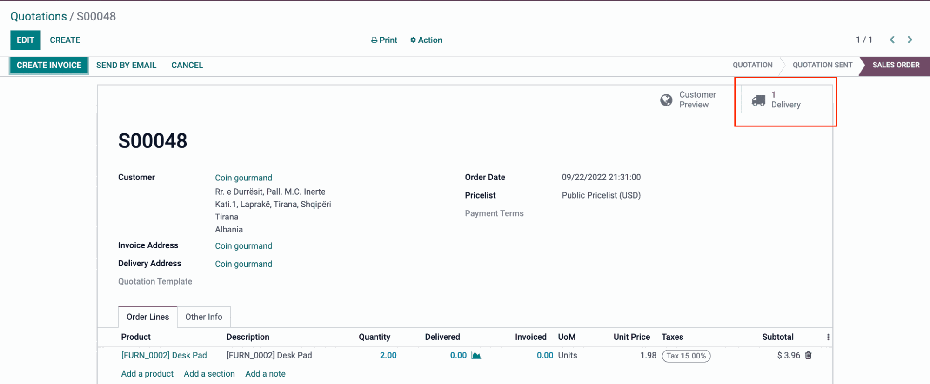
In Odoo Sales, after confirming the Sales Order (SO), click on the Delivery smart button to manage the stock-out/product delivery.
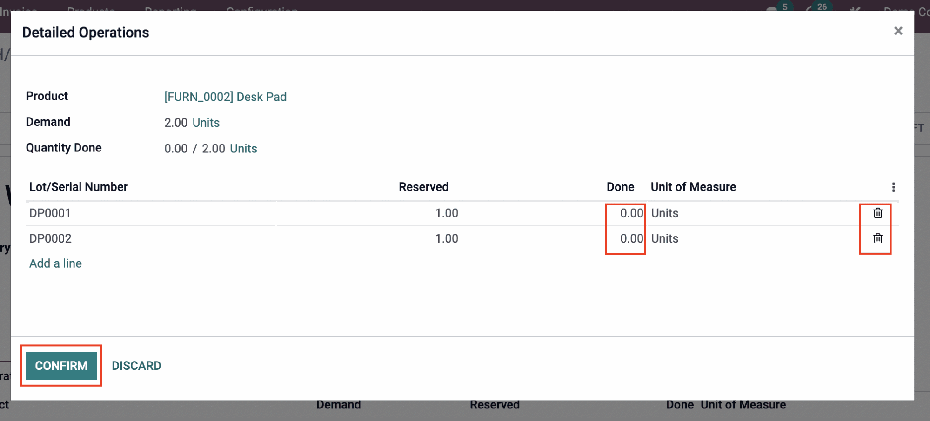
In the window of product delivery in Odoo Sales, you can view/adjust the stocks to sell by clicking on the 'Detailed Operations' icon.

You can now confirm which products by specific serial numbers are to be sold and the number of delivery units, then click Confirm and Validate to initiate the Delivery process.
3. Assigning a serial number to the product with on-hand stocks
What if you want to track existing products with available stocks in Inventory using serial numbers? You can immediately assign the serial number in the Inventory module using the Inventory Adjustment function.
In this case, you will see the notice below when you set tracking by unique serial number for the product.

There are two ways to assign the serial numbers in Odoo Inventory. You can do it in the 'Inventory Adjustment' in the Operations menu or directly assign the serial numbers for stocks (“Desk Combination” product) by clicking on the Units On-hand button in the product form, as shown below.

Then, you choose all currently available stocks. Click on the Apply button → Apply the 'Inventory Adjustment Reference/Reason' in the pop-up window.

By doing that, you can delete the current stocks with no serial numbers and create new stocks with serial numbers set.
To delete the number of original stocks: fill in “0” in the 'Counted Quality' column → Appy.
To create new stocks with serial numbers set: click on Create button → Add a line → set the serial number in the 'Lot/Serial number' column → Set “1” in the 'Counted Quality' column → Apply.

Then, continue for the rest of the product stocks with new serial numbers. Let's say the theoretical quantity is 5, create five new lines for that product with a new serial number and real quantity=1.
However, suppose there are a large number of product stocks, such as 28 pieces of Desk Combination, the time-saving way to assign a mass serial number is to import the list of serial numbers from Excel to Odoo.
To assign serial numbers in the Inventory Adjustment menu, the actions are the same as in the direct Product menu.
You go to Inventory → Operations → Inventory Adjustments and start a new inventory.
For each product, you need to replicate the same number of stock lines as the original quantity, assign the serial number, and set the real quantity for each new line as 1.
Then importantly, you need to adjust the real quantity of the original line to zero. If not, the system will double the amount of the product. Finally, apply the new setting for all product stocks.
4. Tracking stock movement by Serial Numbers
Odoo Inventory provides two ways to track stocks in the Lots/Serial Numbers menu.
In the menu, go to Products → Lots/Serial Numbers to track all the product stocks.
Track with Location
In the example of the Desk Pad product, to track the DP0001 stock → choose the Location button. It will show you the stock movement with values in the on-hand quality column.


Track with Traceability report
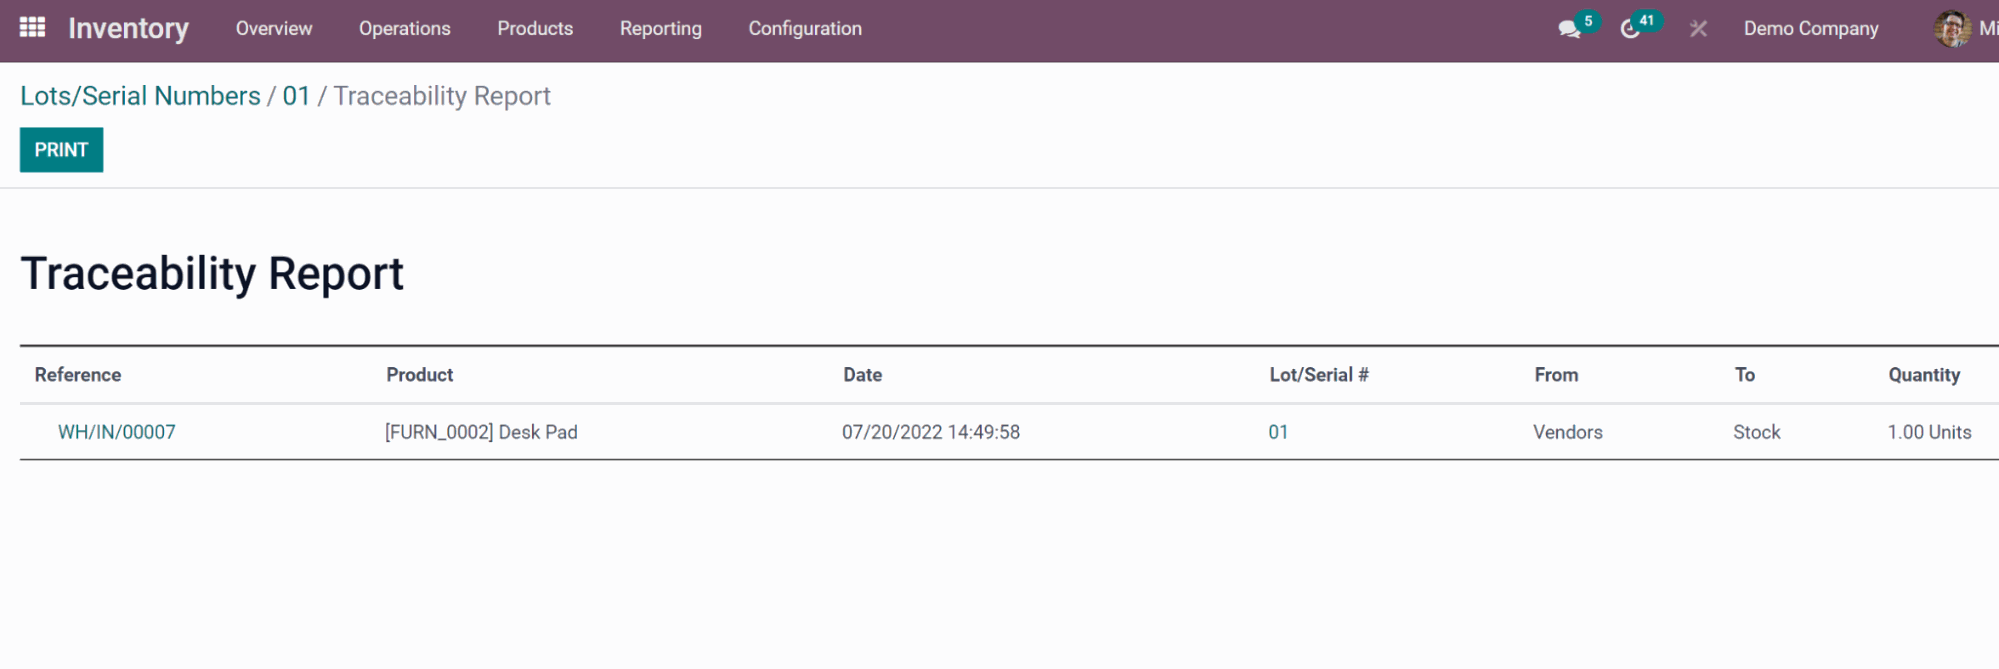
Similarly, to track the DP0001 stock → choose the Traceability smart button. It will show you the stock movement with reference and from-to information.

Tracking products with Lots
When a batch of a product is purchased at the same time, a lot number is used to identify the batch.
1. Product Configuration
To track the batch of a product by lot, go to Products → Products. In the Tracking field under the Inventory tab, choose 'By Lots'.
Similarly to assigning a serial number to product stock, you can assign a lot to a product batch that does not have available stock in inventory.
2. Assigning a lot number to a new product batch with no stock
To assign new product batches with lot numbers, we can do that manually in the Purchase app when making an RFQ.
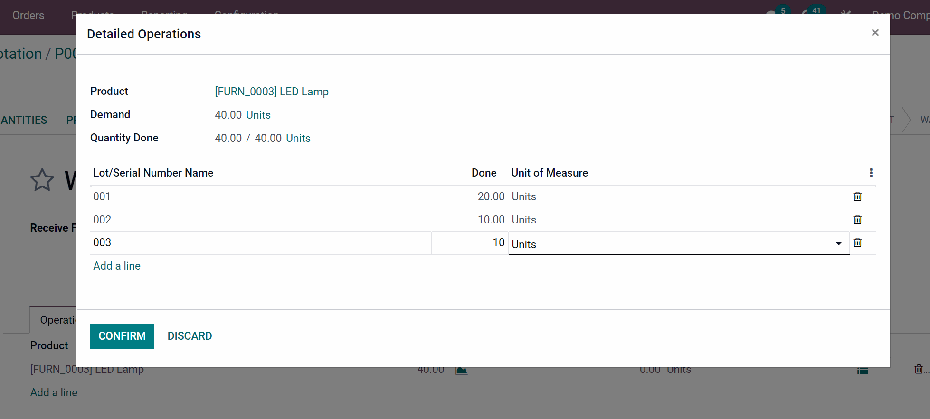
For example, you make an RFQ to purchase 40 pieces of the LED lamp product. After confirming the order and receiving the products, you click on the Receipt smart button in Odoo Purchase to effectively divide the products into batches you can track.
To do it, go to the 'Detailed Operations' wizard; there, add a line to assign the number of product lots you would like to do.
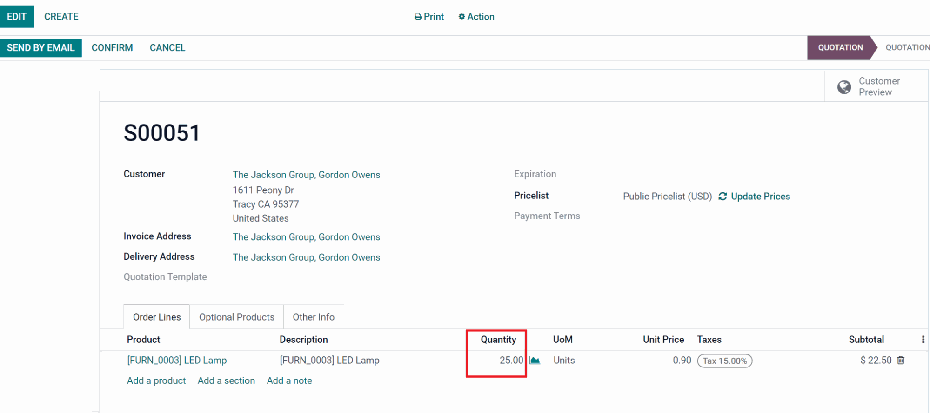
Then, let's see how the product moves in Odoo Sales with lot tracking. We will make a SO for 25 units of LED lamps, as shown below.
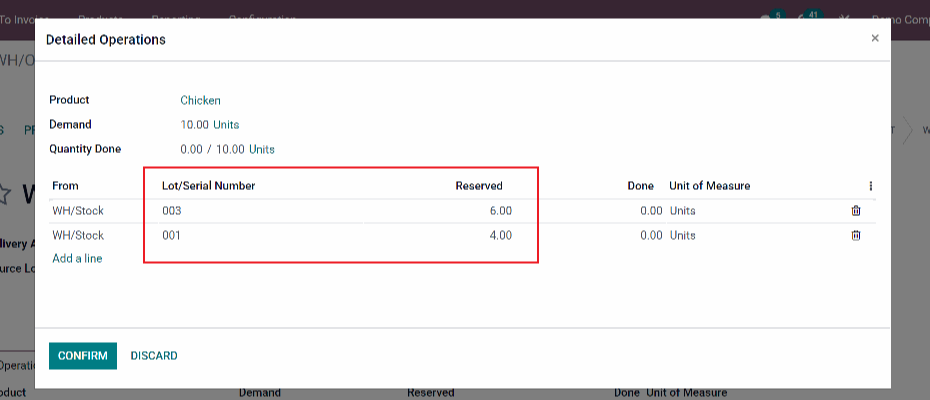
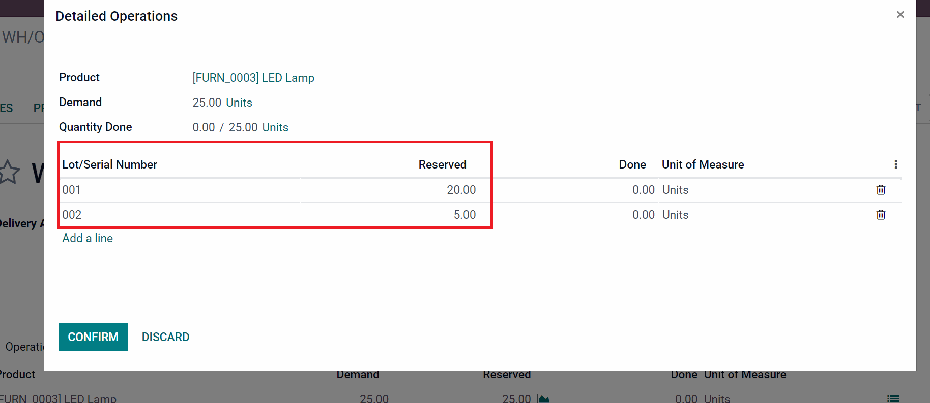
After the SO is confirmed, Odoo will automatically generate a delivery order where you can track how the product lots are reserved for the customer. You can remove the automated reserved lots and add other lots available in the inventory based on your need.
What is more? You can also assign lot numbers to products by importing them from an excel sheet. Check Odoo documentation to learn more about this.
3. Assigning a lot number to a product batch with on-hand inventory
Similar to assigning serial numbers to the on-hand product stock in Odoo Inventory, you can use the Inventory Adjustment function to assign the lot numbers to the product batches with on-hand inventory in Odoo.
You can either add lot numbers directly by clicking on the Units On-hand button in the product form or doing it in the Operations menu → Inventory Adjustment.
To do it in the 'Units On-hand' window, you choose the origin line and click the Apply button → Apply the 'Inventory Adjustment Reference/Reason' in the pop-up window.

By doing that, you can delete the current stocks with no lot numbers and create new batches of products with lot numbers set.
To create new product batches with lot numbers set: click on Create button → Add a line → set the lot number in the 'Lot/Serial number' column → Set “1” in the 'Counted Quality' column → Apply.
To delete the number of original stocks: fill in “0” in the 'Counted Quality' column → Appy.

To assign lot numbers in the Inventory Adjustment menu, the actions are the same as in the direct Product menu.
4. Tracking product batch with lot number
Odoo Inventory allows you to check product batch movement with the lots using the Location or Traceability report feature.
Go to Products → Lots/ Serial Numbers.
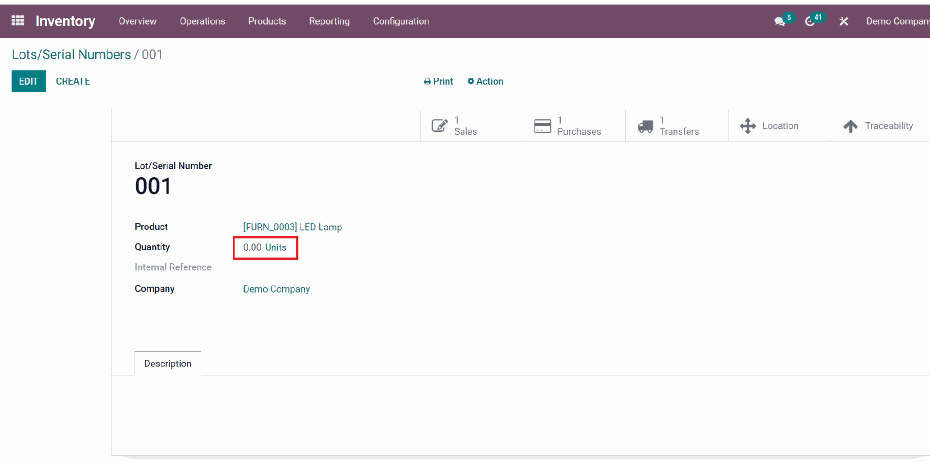
In the LED Lamp product example, you track lot 001 stock with the available unit. On the bar of smart buttons in the right corner, you can choose either the Location button or the Traceability button to check the movement of the product batch.

Experience traceability with Odoo’s double-entry inventory system
Solution: Order Management with Removal Strategies
When processes aren’t always efficient, it is imperative that businesses use the right inventory automation system, or products are automatically selected when sales orders are triggered. Thankfully, the removal strategy in Odoo is up to the task.
There are three removal strategies we will discuss;
FIFO (First-In, First-Out): is best for perishable products with expiry dates like food, medicine, and cosmetics. The method ensures that products are sold in the order they got into the warehouse or shelf.
LIFO (Last-In, First-Out): is preferred for convenience stores, particularly those that sell tobacco and fuel due to the possibility of product inflation in short periods. The latest products in the inventory are sold to customers. Please keep in mind that LIFO is prohibited in many countries.
FEFO (First-Expired, First-Out): this is a strategy in which the product with the closest expiry date is sold first. If you sell perishable goods, work in the beverage industry, or run a pharmacy where offering a product past its expiry date can have serious consequences, FEFO is the best option.
Product Configuration
To set up the removal strategies, go to Configuration → Settings.
You enable 'Lots/ Serial Numbers' in the Traceability function, 'Storage Locations', and 'Multi-Step Routes' in the Warehouse function and Save.
Note: This setting is true for all three removal strategies. For the FEFO strategy, additionally, enable the Expiration Dates.
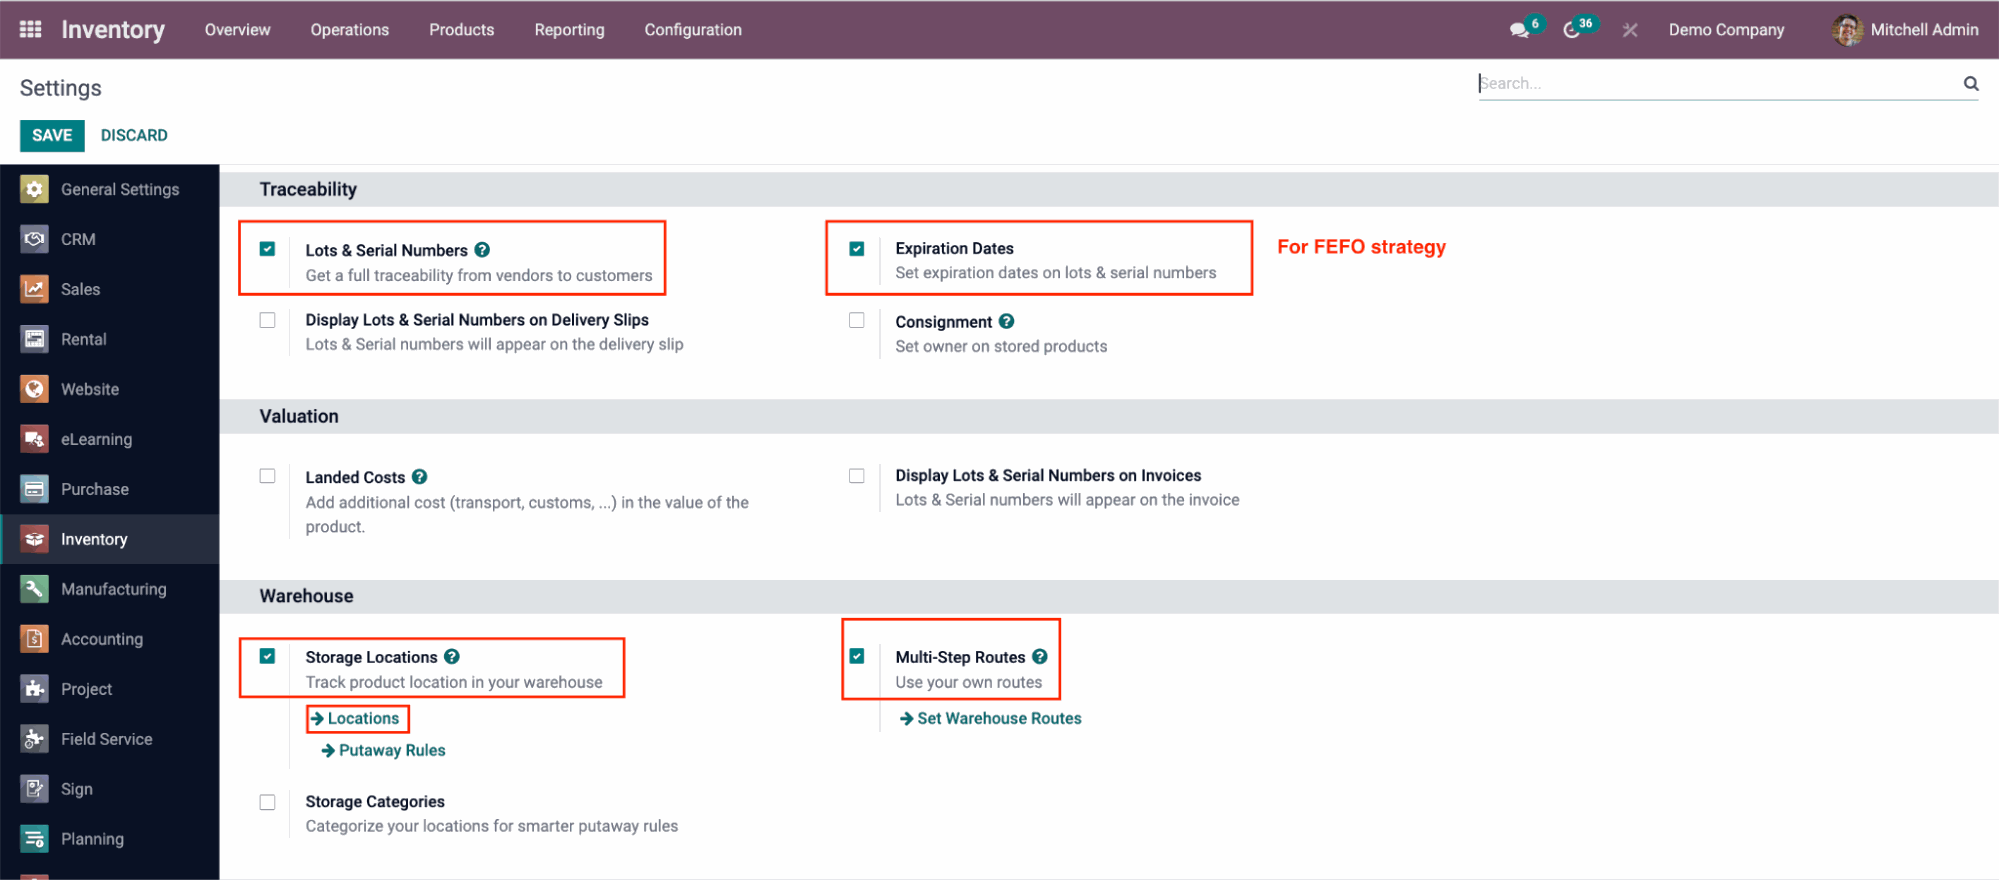
Next, go to Locations to apply the removal strategy to your target warehouse location. The strategy will work for both product batches with lots and products with serial numbers.
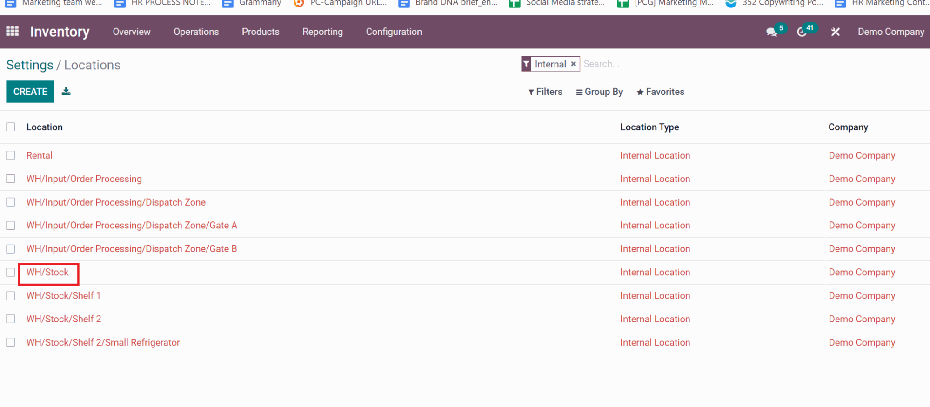
1. Setting FIFO Removal Strategy in Odoo
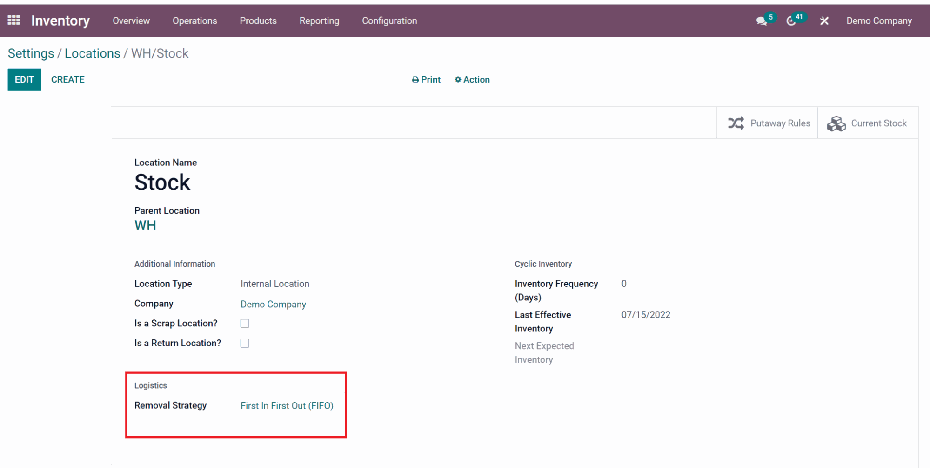
To set up the FIFO removal strategy for a particular warehouse location, for example, “WH/Stock,” under the Logistics field, choose 'First In First Out (FIFO)'.
When the FIFO method is used for products tracked by lots/serial numbers, the first lot/serial number purchased and moved into inventory is the first lot/serial number moved out of the warehouse and sold to the customer.
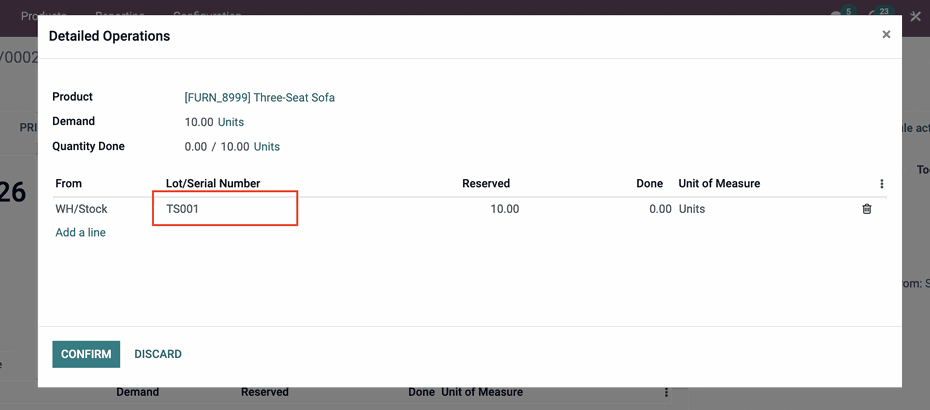
Below are two lots of “Three-Seat Sofa”, TS001 and TS002, purchased at different times.

Following the FIFO strategy set, when the products were ordered, Odoo took the stocks in lot TS001 for delivery order.
2. Setting LIFO Removal Strategy in Odoo
Similarly, to set up the LIFO removal strategy for a special warehouse location, for example, “WH/Stock,” under the Logistics field, choose 'Last In First Out (LIFO)'.
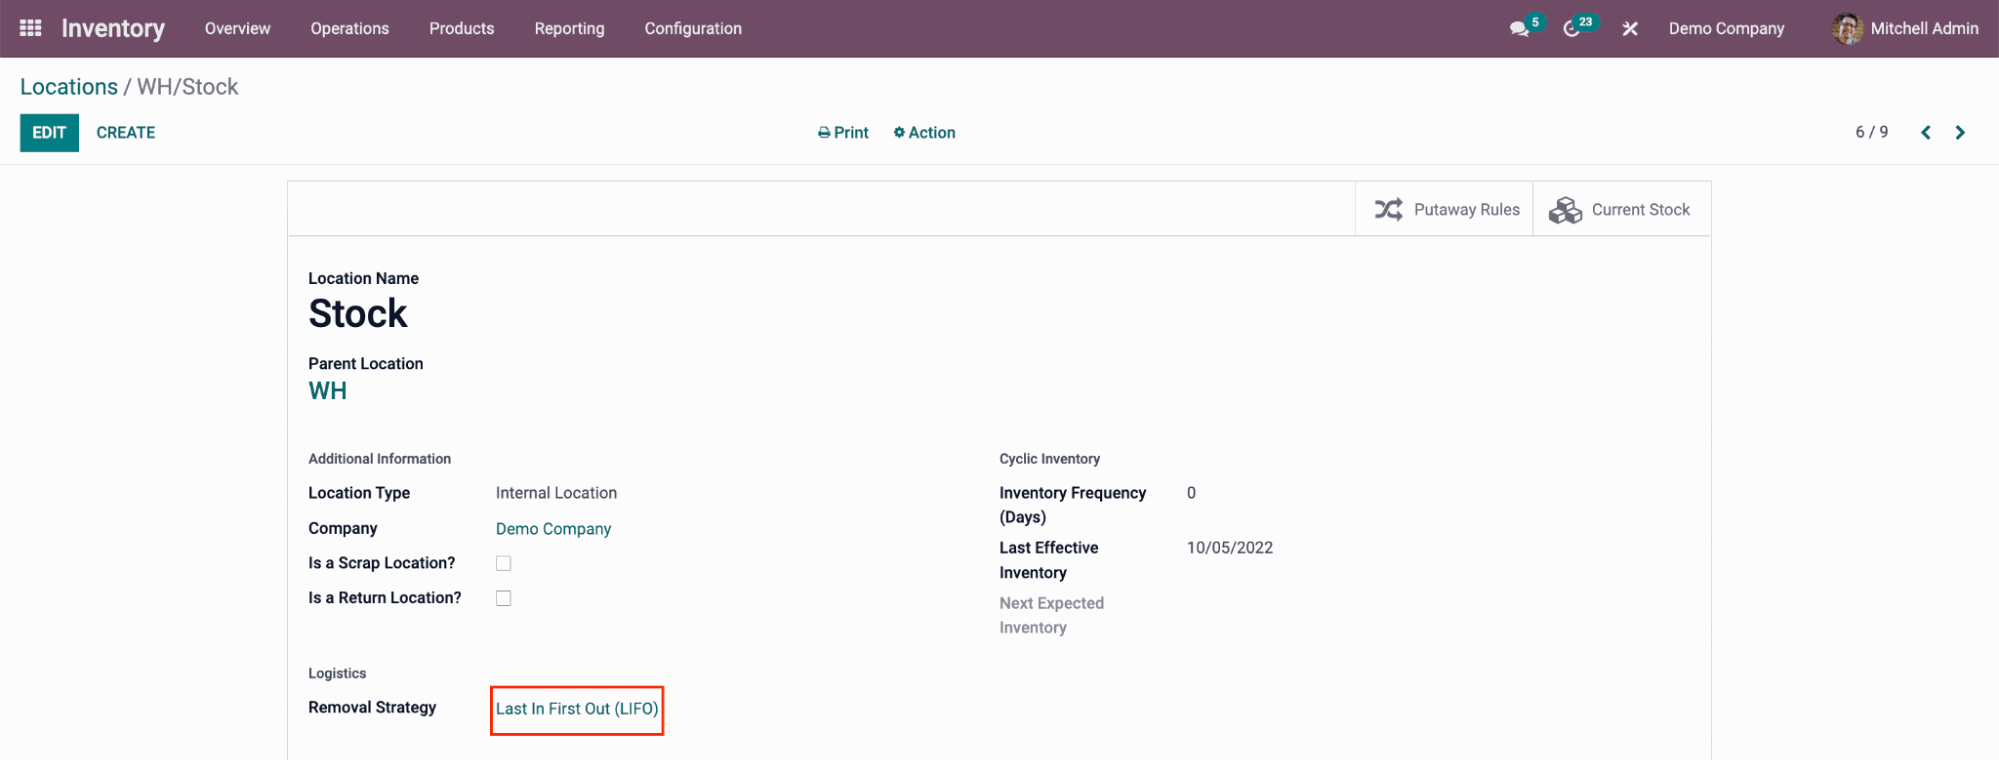
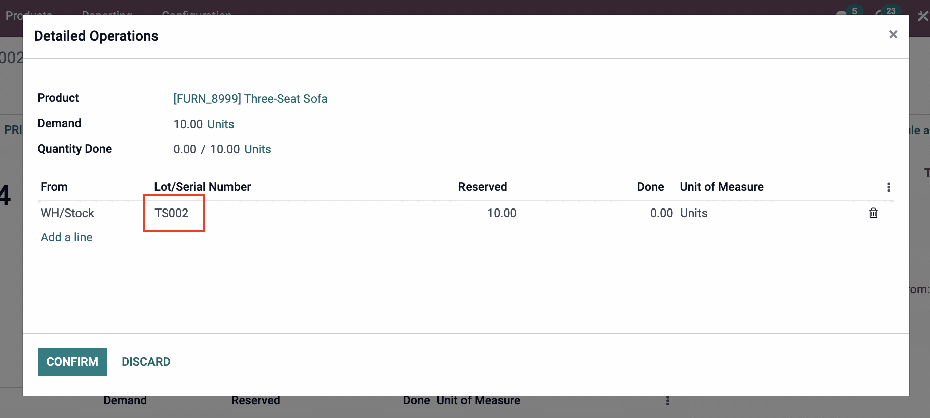
Under the LIFO strategy, the last lot/serial number purchased and moved into inventory is the first lot/serial number moved out of the warehouse and sold to the customer.
Therefore, when the “Three-Seat Sofa” was ordered, Odoo took the stocks in lot TS002 for delivery order.
3. Setting FEFO Removal Strategy in Odoo
Say you sell fresh goods; it is only wise to sell products with earlier expiry dates. How do you ensure sales/retail associates always sell the right products? Odoo helps with its FEFO removal strategy. Let’s find out how.
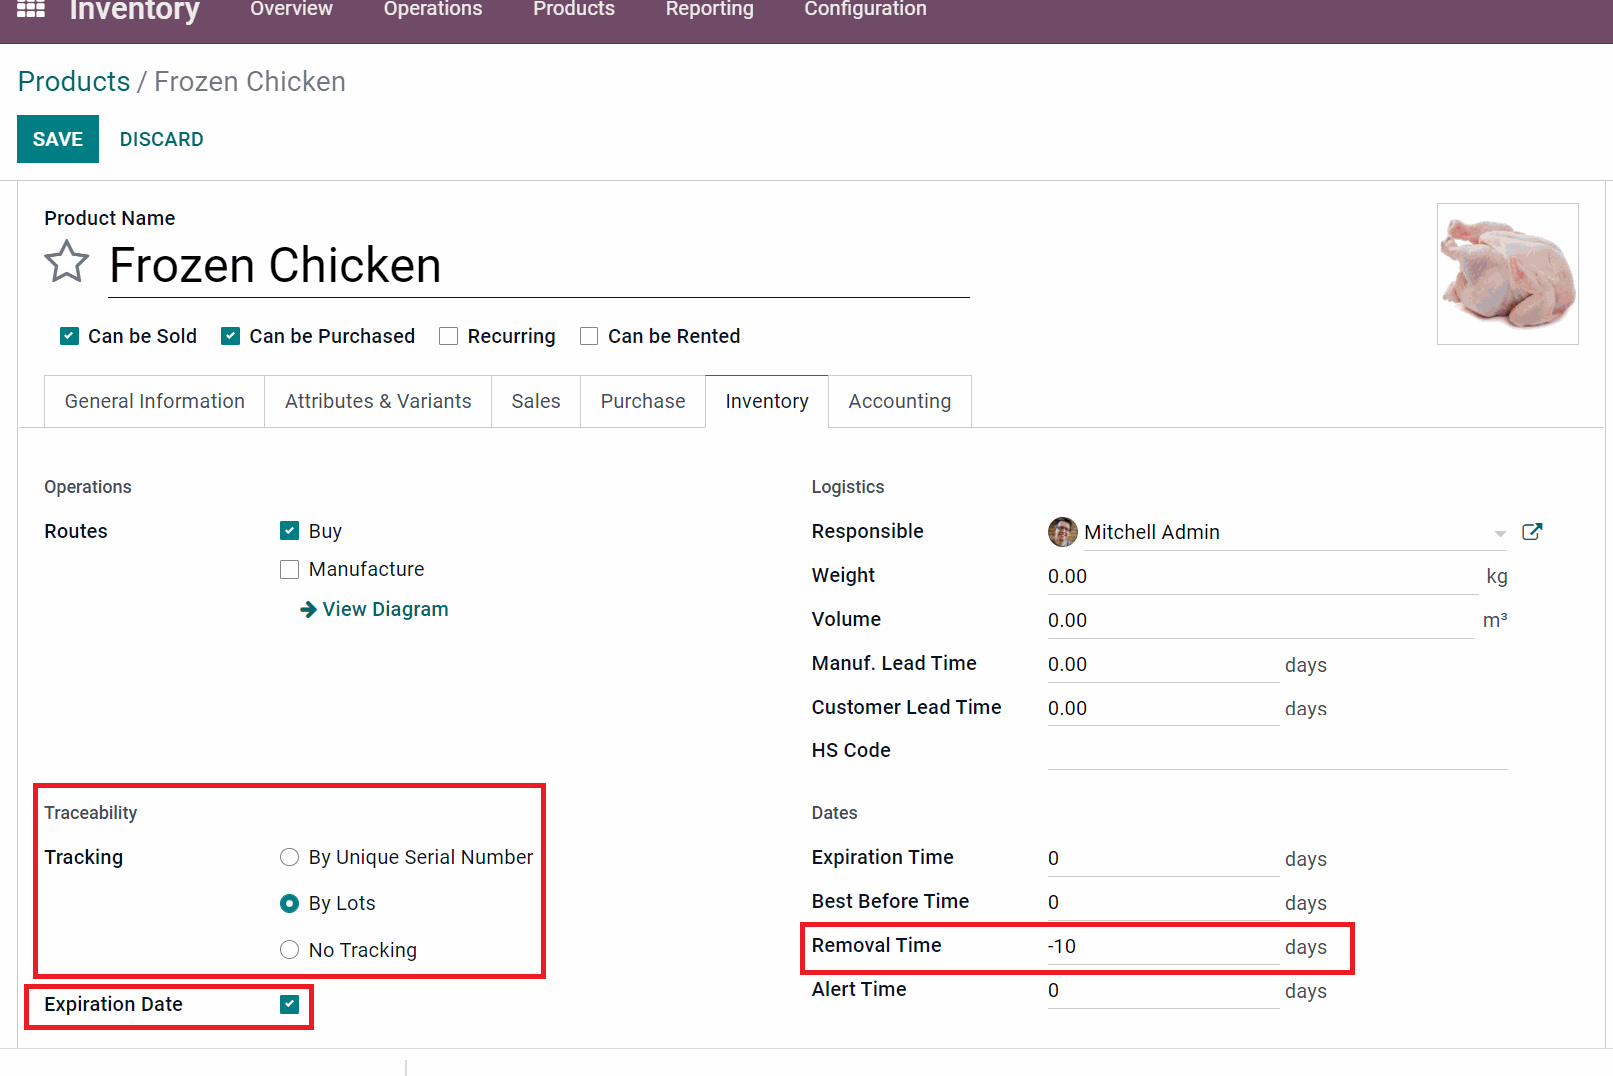
First, make sure the settings for FEFO are done. Then, you go to Products → Products to configure the required inventory rules for the perishable products.
Under Traceability tab:
Choose to track by 'Lots/Serial numbers'
Tick on 'Expiration Date'
Under Dates tab:
Set up the number of days for expiration time, best before time, removal time and alert time for the product.
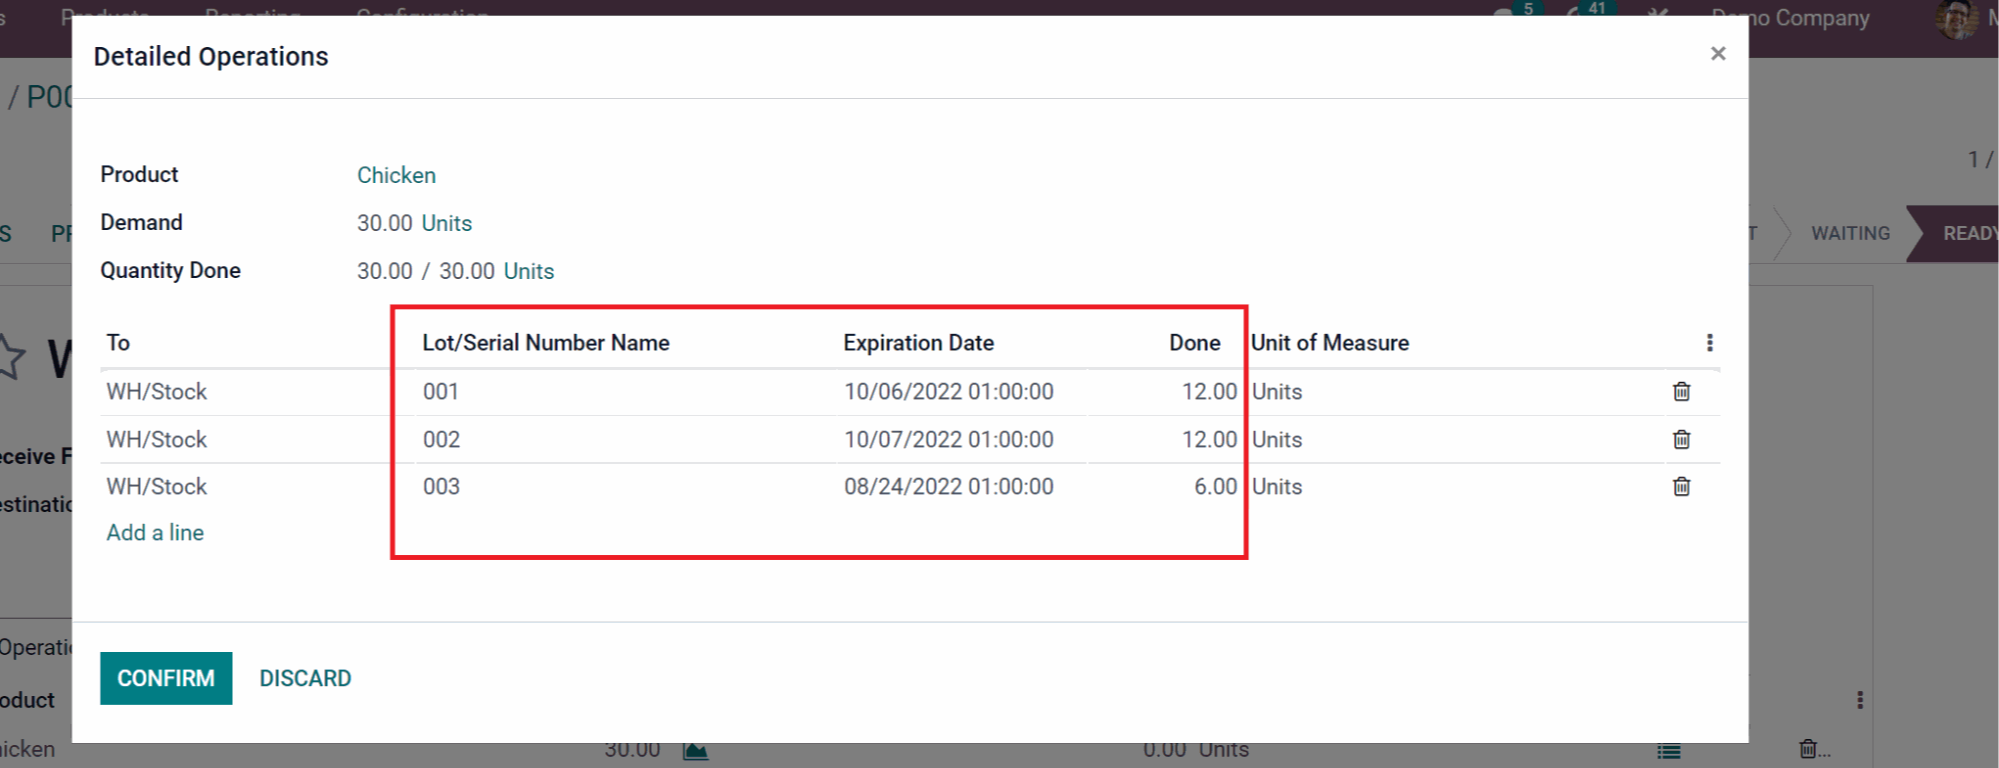
With the perishable products applied FEFO strategy, you should add the expiration date for each product lot/serial number when you purchase them, as shown below.
When customers make an order, the products from lots with the earliest expiration date will be moved out of the warehouse and delivered to a customer first.
The question you would want to ask now is, ‘which of these removal strategies best suit our company?’ Whatever you choose, you have now seen that Odoo can make life easy for everyone – your team and customers.
Conclusion
How powerful is Odoo Inventory? What would you say is your favorite feature - the ability to quickly trace all products even after you have sold them or smartly handling removal strategies in different locations?
Odoo inventory works, and this piece has shown two important ways businesses use it. If you have specific requests or questions about inventory management, our award-winning team is happy to help. You can reach them here.


